Reinstalling the system from a flash drive. Installing the Windows operating system on a computer via a USB flash drive. How to install Windows from a flash drive. Create a bootable flash drive or disk
This method installation is suitable if you own a netbook or your CD / DVD drive is out of order and you need to install Windows 7. This method is also good because the process of installing Windows 7 from a flash card is several times faster than from a CD or DVD disc.
Before proceeding to Windows entries 7 to a USB flash drive, copy all important data from the USB flash drive to other storage media (hard drive where Windows will not be installed, another flash card, disk, etc.), since in the process of formatting and writing the Windows 7 image to a USB flash drive, all data on she will destroyed.
First way
If you are creating a bootable USB flash drive while in the Windows 7 operating system, then you will need a program Windows 7 USB/DVD Download Tool, which can be downloaded from Of. Microsoft website at the link.
If you are creating a bootable USB flash drive under the Windows XP operating system, you will need to install Microsoft .NET Framework 2.0 And Microsoft Image Mastering API 2.0. Of course, if you already have them installed (more often for the first program), then you do not need to reinstall them.
1) Insert the flash drive into the laptop.
2) Run the program. Click the button Browse.
3) Select the ISO image of Windows 7 and click the button Open.

4) After you have specified the ISO image of Windows 7, click the button Next.

5) Press the button USB device.

6) Your flash drive should appear in this window. Click the button Begin copying

7) Click on the button Erase USB Device

8) Click Yes.
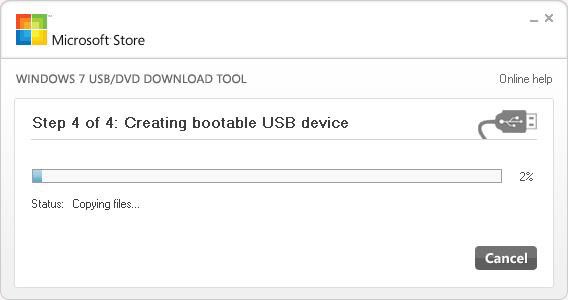
9) The process of writing the Windows 7 image to a USB flash drive will begin

10) When the recording is completed, the status will change to Backup completed . close the program

Second way
For the second method, you will need a program UltraISO.
1) Insert the flash drive into the laptop.
2) Run the program. On Windows 7 and Windows Vista It is recommended to run the program as administrator.
The UltraISO program is paid, but you can use the trial period, consider this option. Click the "Trial period..." button

3) Select a menu item File ->Open...

4) Select the ISO image of Windows 7 and click the button Open.


6) In the field Write method: select USB-HDD. Click the button Format.

7) The formatting utility will start. Click the button Begin.

8) Click OK.

9) After formatting, a success window will appear. Click OK.

10) Close the program.

11) Press the button burn.

12) Click Yes.

13) The process of writing the Windows 7 image to the USB flash drive will begin.

14) At the end of the entry in the column event the message "Recording completed!" appears. Close the program.

Third way
For the third method, we need the WinSetupFromUSB 1.0 Beta 7 - program.
Note: the link is a newer version, but the principle remains the same.
1) Insert the flash drive into the laptop.
2) Run the program. In Windows 7 and Windows Vista, the program must be run as an administrator.

In field USB disk selection and format should be your flash drive.
Note: If the flash drive is not detected, then format it with the PeToUSB or HPUSBFW utility.
Also, the flash drive may not be detected if it is inserted into the laptop after the Winsetupfromusb 1.0 Beta7 program has been launched and in order for it to be determined, just press the button Refresh.
3) Press the button RMPrepUSB.

4) We mark such lines as: WinPEv2/WinPEv3/Vista/Win7 bootable (CC4), NTFS. Put a tick next to Boot as HDD (C:2PTNS). Click the button 6 Prepare Drive.

5) Press the button OK.

6) Press the button OK.

7) After that, this will appear Dos window.
Warning: Do not close this window. It should close automatically.

8) After Dos the window closes click the button exit.

9) Check the box next to Vista/7/Server 2008 - Setup/PE/RecoveryISO. Click on the square on the right.

10) A window will appear Folder overview where you need to choose virtual drive into which the ISO image of Windows 7 is mounted.
After you have done this, press the button OK.

11) Press the button GO. The process of writing Windows 7 to a USB flash drive will begin.

12) When the recording is finished, this small window will appear. Click OK.

13) Close the program.

Fourth way
The installation method is quite simple, so anyone can do it! For this we need:
1) Windows 7 image
2) A flash drive with a capacity of at least 4GB
3) A program for creating and editing ISO images, ultraISO from the above method or a free MagicDisk
You can take any media from a regular flash drive to an SD card, but not less than 4GB!
4) Run the command line (in Windows XP, these are standard-> command line. In Windows Vista / Windows 7, open start, at the very bottom there is a search, enter cmd and open as administrator).
5) Next to command line enter diskpart, the disk management utility will open.

6) Further already in the diskpart utility enter: list disk, and all physical disks PC, namely disks and not partitions.
Among them we are looking for our flash drive.

7) Then we execute the command select disk#, Where # this is the number of our flash drive.
In this case, the flash drive on the screen is number 1, therefore s elect disk 1. All further manipulations will be carried out only with this disk.
8) Execute the command clean, clear the drive, then the command create partition primary- create a new partition on the disk.
9) After creating a new section, write select partition 1, select this section for manipulation, enter active, thereby making the section active.
10) Now in order for the flash drive to be visible in bios, you need to format it in NTFS format, which we do with the command format fs=NTFS.
11) Next, you need to activate the process of connecting the device and assigning letters to it, we do this with the command assign.
Everything, the preparation process is completed.

Installing Windows 7
Distribution recording can be done with any file manager or free .
In this case, you need to somehow open the image of the installation disk with the OS, you can do this with any disk emulator, Alcohol or MagicDisk, create an image and copy everything from it with a file manager to our prepared flash drive.
Everything, the process of creating an installation flash drive is completed, now we are trying to install the OS by first setting it in bios.
Well, that's all, which of the four ways to create bootable flash drive use - you decide.
Inclusion in Boot BIOS from a flash drive
Before you start installing Windows 7 from a USB flash drive, you need to go into the BIOS and enable booting from a USB flash drive.
To enter the BIOS, you need to press a certain key when the computer boots. On desktop computers this is the Del key. On laptops, the most commonly used key is F2.
Usually, when you turn on the laptop, a screen appears on which at the very bottom there is a line that says which key you need to press in order to enter the BIOS.
If you do not have such a line, then you need to look at the information on how to enter the BIOS in User Manual walking with a laptop.
1) We insert the USB flash drive into the laptop, if it is not inserted.
2) Turn on the laptop, if it is on, then reboot.
3) We go into the BIOS.
For example, the whole process will look like below, if your BIOS is different, then the principle will remain the same. If you have any questions - write in the comments.

4) Go to the tab Boot. In it, in the boot order, you need to put our flash drive in first place, using the arrow keys and the keys F5 And F6. That is, with the arrow keys we select our flash drive, and with the key F6 take her to the top.
To find out which keys you need to use to set the boot order, see the hints on the right.
The name of the flash drive must appear in the line USB HDD.
Also, a flash drive can appear in the line USB key.
To save the changes and exit the BIOS, press the key F10. (Depending on the manufacturer of the BIOS, the key may be different. See the hints on the right or below).

5) A window will appear asking you in English to Save changes and Exit? You are taking Yes.

6) After that, a reboot will occur and the installation process of Windows 7 will start.
Installing Windows 7 from a flash drive
If a bootable USB flash drive with Windows 7 was created using WinSetupFromUSB 1.0 Beta 7, a green screen will appear first. Select Start Vista/Win7/Server 2008 Setup or PE/Recovery ISO from partition 0.

Next, the Windows 7 setup program will launch.
Write in the comments what is not clear and what questions you have.
Computer crashes are not uncommon. Then the antivirus will give a miss, and viruses will settle in the system, then the program will not install correctly and start sending spam in the form of error messages, then after the next windows updates will retire. One way or another, one of the solutions to problems is still reinstalling Windows. It seems to be simple: we swam, we know installation disk used more than once. Only now this cunning trick does not always work now. Netbooks don't have DVD drives. So the question comes to mind, but how to reinstall Windows from a USB flash drive on a PC? It's actually very simple.
Step #1: Preparing the Computer
Let's start with a banal action - copying data from local disk C. For some, it may be news that after reinstalling Windows, all information on the hard drive will be deleted. But you and I are well aware of this and therefore do not forget to take care of backing up important documents and files from the working drive C in advance.
Step #2: Create a Bootable Flash Drive
It's no secret that you can make an installation from an ordinary flash drive with the most different ways. One way or another, all the original data on it will be deleted regardless of the method used. At the same time, methods such as:
- configuration via command line;
- processing in the Rufus utility;
- writing an iso image to a USB flash drive via DAEMON Tools ;
- recording in the UltraISO program;
- preparation with the program Windows 7 USB/DVD Download Tool;
Each of these methods, of course, has its own advantages. However, the easiest way, perhaps, is to use such utilities as Rufus and DAEMON Tools. If you want to try other methods, read on.
Option #1: DAEMON Tools Ultra
You can download the program directly from the official website. In fact, it is paid, but the developers provide users with the opportunity to test it absolutely free for 20 days. Agree, during this time, not only one, but a whole ton of flash drives can be prepared.
How to work with DAEMON Tools Ultra? Simple enough. Open the program, go to the "Tools" menu and select the "Burn boot image ..." item in it:

After that, we insert a USB flash drive with a memory capacity of 8 Gb into the computer and alternately perform the following actions in the program:
- select USB drive;
- write the access path to boot image windows;
- set the MBR parameter for writing;
- put a tick in front of the "Format" item;
- choose file system. For those who do not know what is the difference between FAT32 and NTFS and which one to prefer, we will explain. The first type of file system is suitable for computers with a standard BIOS. In UEFI, NTFS devices are often unreadable. But FAT32 can be used in both versions of the BIOS;
- if necessary, prescribe the volume label (rename the flash drive);
- check the availability of free space on the USB-drive and press the "Start" button.
This process looks like this:

In principle, this is all that is needed, so after clicking on "Start" the Windows image will begin to be written to the USB flash drive in automatic mode:

It remains only to wait for the completion windows records to the flash drive, and then click the "Finish" button:

Easier than simple, right?
Option #2: Rufus
It is equally convenient to create a USB-drive with iso- way Windows through the program Rufus 1.4.12. You can also download it absolutely free from the official website of the developer. The instruction for it looks like this:

Step #3: Set up computer startup
After the USB installation media with the Windows image is ready, you can safely take on editing the computer boot process. Note that you can set the launch from a USB flash drive in different ways:
- using hot keys;
- through bios.
In the first case, when loading the PC, it is enough to press a special button, and then from the proposed options, select to start from a USB drive. As a hint:

In the second case, in order to enter the BIOS, at the time of booting the computer, you will need to press F1 / Del / F2 / F3 / Tab + F2 / Esc on the keyboard. The key combinations may differ depending on the PC manufacturer, as well as the options after opening the program itself. True, the reason for the discrepancies will be different - a different interface in BIOS versions(Award, AMI, Phoenix-Award, UEFI).
step by step Windows installation 7 from a flash drive!
Were going to install windows 7, but your DVD drive refused to work? Or do you not have it at all, since you use a netbook? Indeed, the situation is not pleasant, but there is no need to despair. great way way out of this situation installing windows 7 from flash drive.
Note that for the installation process you will need:
- Flash drive, the volume of which must be more than 4GB.
- ISO image from Windows 7.
- Windows 7 USB/DVD Download Tool 1.0.
For simplicity, we will conditionally divide the entire process of installing windows 7 into several stages:
- Create a bootable flash drive.
- Installation operating system.
We go to the “Start” menu, select “Control Panel”, then click on the item “User Accounts and Family Safety”, and finally, select “User Accounts”. Click on "Change User Account Control Settings".

Move the slider to the very bottom, then press ok.

We confirm our decision by pressing the Yes button.

Congratulations, you have passed the first stage - disabled User Account Control.
2. Create a bootable flash drive
There are several ways to install the windows 7 operating system. Installing from a USB flash drive using Windows program 7 USB/DVD Download Tool 1.0 is the easiest and fastest. Connect the flash drive to the computer, after copying all the important information from it. Next, launch the USB/DVD Download Tool and click Browse.

Select the operating system ISO image and click Open.

After you have specified the ISO image on your computer, click Next.

Click USB device.

In this window, select the connected flash drive and click Begin copying, which will start the copying process.

Click Erase USB Device to format the flash drive.

Click Yes to confirm your decision.
The process of writing the image to the USB flash drive has begun.
Once the recording is completed, Backup completed will appear. You can safely close the program.

That's all. You yourself have created a bootable flash drive. As you can see, installing windows 7 from a flash drive is not at all difficult if you follow these steps.
Before you start installing Windows 7, you need to set the USB flash drive to the first place in the boot priority in the BIOS. To get into the BIOS menu, you need to start a certain key when the computer boots. It can be Del or F2. When loading at the bottom of the screen, you can see this prompt:

In BIOS, look for the Boot tab. Here, in the boot order, you need to put the bootable USB flash drive in the first place. To do this, use the arrow keys, as well as F5 and F6. Use the arrow keys to select the flash drive, and use the F6 key to bring it to the first position. Next, save your changes and exit this menu by pressing F10.

A window will appear where you need to click Yes, confirming your intention to put the flash drive in first place in the boot order. If everything is done as described here, then after restarting the computer, the installation of windows 7 from the USB flash drive will begin.

Select the basic installation options and click Next.

Click Install.

We agree to the license agreement by ticking the appropriate box. Click Next.

At this point, you will be prompted for several types of installation. We recommend choosing the full installation.

Here you need to specify the partition (disk) on which Windows 7 will be installed. Pay attention! Do not put the operating system on hidden sections if there are any.

After selecting the partition where you plan to install the OS, click Disk Setup.

Click Format. Note! When formatting, all data on this drive will be permanently deleted.

If this section does not contain any important information feel free to press ok.


The installation of windows 7 will begin from the USB flash drive.

If all files are copied, the computer will reboot for the first time. If you don't want to wait 10 seconds for your computer to restart itself, click Restart Now. During the reboot, be sure to return the hard drive to the first place in boot priority, otherwise you will start installing the OS again.


Here you need to enter Username and Computer Name. Let's move on.

Optionally, you can set a password for your account.

Enter license key in field. Please note that you can enter the key after the system is installed. Click Next.

Here we specify the security settings.

Specify Date and Time.

Specify network settings.

If you followed these steps, then you will see this image, which indicates that the installation of windows 7 is complete, for which we congratulate you!

Video tutorial on installing Windows 7 from a USB flash drive
Write in the comments below if something doesn’t work out for you or you have difficulties - we will figure it out together!
Why do I need to install an operating system from a USB flash drive?
After all, for this from time immemorial there are installation disks.
The fact is that in some models it is simply missing or broken, and you need to reinstall the operating system.
And carrying (and storing) a flash drive is much more convenient than a CD-RW.
The installation process itself, if you understand the issue, is not so complicated.
It can be divided into several stages:
- Copy operating system to flash drive
- Prepare your computer for installation
- Set BIOS to Boot
- Install operating system
Of course, if you are on “you” with a computer, then you can cope with the task if you spend some time clarifying some points of the process on the Internet.

If knowledge on this topic is not enough, then this article will help you choose the right vector of work, and direct your energy and desire to do everything yourself in the right direction.
So, let's go through each point in more detail.
How to copy the Windows operating system to a USB flash drive

As it becomes clear from the title, the first thing you will need to do is copy something somewhere. This something is an image of the necessary operating system. Somewhere - our, in the future, installation flash drive.
To copy we need:
- flash drive with 4 GB or more. It all depends on which OS you want to download and then install on your laptop or computer.
- image burning program (WinToFlash, WinSetupFromUSB), which can be downloaded from the Internet.
- the operating system image itself.
You can buy a new flash drive or use an existing one.
Programs for installation
We download the program for recording the image from the Internet (there will be no problems with this item - you can find anything on the network)
We download the image of the operating system from a more or less normal torrent tracker.
Be sure to remember exactly where the image is saved on the computer: the name of the disk, the name of the folder.
For this purpose, you can create a special folder NOT on the desktop and NOT on drive C. You will find out why later.
Tip: before starting work, transfer the information from the USB flash drive (if it is not new) that you are going to use to another medium! Since, in the process of transferring the operating system to a USB flash drive, all information on it will be erased forever.
We download the program. For example, WinToFlash.
After the program is downloaded, run it.
In the window that opens, select the OS that we need to copy from the list.

In the window that opens, specify the path to the image of the operating system (the one that we remembered in the previous paragraph).
That is, from the drop-down list, select the drive, folder and the file itself.
And in the next drop-down line - to the media on which this image will be stored, that is, a flash drive.
We boldly press the "Run" button and wait while the process of formatting the flash drive and rewriting files from the computer to it is in progress.
The first step is done - we have a flash drive with which you can install the operating system.
There is another option for creating an operating system image - an image directly of your OS.
To do this, go to the "Control Panel" item through the "Start" button. Select the "Backup and Restore" section.

In the window that appears on the left, we are looking for the item "Creating a system image".

After clicking, a window will open in which we need to choose where the image of our operating system will be saved.
It is better not to save on your hard drive, but to use a removable hard drive for this purpose.
To do this, select in the drop-down list of the item "Hard disk" the media to which the image will be copied.

After that, the program will prompt you to select the disks from which the image will be copied.
In this case, we are interested in system disks. Put a check in front of "With (system)" and "Reserved by the system (system)". It is from them that information will be archived.
In the next window that appears, you will need to confirm the archiving.
In it you will also see the amount of memory that the image will take, as well as the disks that were selected.
Making archiving
If you have no objections at this stage, then you can start the process by clicking the "Archive" button in the lower right corner of the monitor.
The duration will depend on the amount of information being archived. But the ability of your computer will play an important role.
If the machine slows down during operation, then it will not fly during archiving.
After the end of this process, the system will specify whether you want to write the received archive to a removable disk. Given that you just saved the data there, we refuse this offer.
IN this moment You are the proud owner of a backup recorded on a removable disk. Yes, the name of the created archive is Windows Image Backup.
Preparing your computer for reinstallation
The operating system of a computer is the main part of the system software.
The OS is responsible for managing your computer's resources. Failure of the operating system leads to the failure of the entire PC.
It sounds serious, but this does not mean that the reinstallation process itself is so complicated and incomprehensible.
All computer preparation, by and large, comes down to copying the files you need from drive C to another drive, for example, D or any removable media.
Perhaps it necessary programs, drivers network card saved on drive C important files.
At this stage, it is better not to be lazy and look through all the files of the C drive.
This is necessary so that later you do not grab your head and do not waste time restoring some important, but not saved document.
Tip: it is initially undesirable to store any files that are not involved in the operation of the system on the system drive C. If the download of files initially occurs in the “Downloads” (or “Download”) folder on drive C (Fig. 4), then they are still it is better to transfer to another disk. Don't litter the C drive.
After everything you need has been successfully duplicated on another disk, the contents of the system disk have been checked again, you can proceed to the next step.
BIOS setup for OS boot
First, let's find out what a BIOS is. BIOS is a firmware that is responsible for managing the configuration of components system block, as well as loading the operating system.
The BIOS is located on the motherboard, which controls the operation of all computer components and is responsible for their correct interaction during operation.
Tip: the mouse does not work in the BIOS, so we do not torture it to no avail, but use the arrow keys, ENTER, or read the "Help" section in the same BIOS.
You can enter the BIOS while the computer is booting during startup or reboot.
To do this, during boot, when a black screen appears on the monitor with white letters and a logo in the upper right corner of the screen, press the Delete key, or ESC, or F2.
The system itself will tell you which key to press. The hint will be written in white letters on a black screen at the bottom or in the center, depending on the brand (Fig. 5).
Entering the BIOS, you need to find and enter the menu section Bootable Device Priority or menu item BOOT. Options for the appearance of the BIOS window are different .

In the Bootable Device Priority folder, select CD-ROM Boot Priority or JetFlashTranced or USB-HDD. Depending on the manufacturer, the BIOS menu may look different.
If these options do not match the options of your BIOS, then we navigate the menu, relying on our knowledge of English and intuition.
In order not to get stuck at this stage, you can, before you start installing Windows on your laptop or computer, study the principle of your BIOS on the Internet.
There is a lot of information on the web, both textual and video.
After spending relatively little time and digging through several specialized sites, you can get information that will allow you to complete the reinstallation process without any problems.
By selecting the desired item, which will tell the computer that the next boot will not occur with hard drive, and from USB, you can leave the BIOS, saving all changes.
Installing an operating system from a flash drive
Provided that all the previous steps are performed correctly, the following window will appear on the monitor during the reboot.
Or as in Figure 14:
We press, as requested, any key (Press any key ...).

A Windows installation window appears, where, for starters, they are asked to select a language, country, time format.
Since the installation is what this whole process was started for, we press it without hesitation.
In the list that appears, select the version of the operating system that we need.
But there is one point. You must select the OS version for which you have a key.
The key is a set of characters on a small piece of paper, which must be attached to the bottom of the laptop or the case of the computer's system unit.
Therefore, before starting the installation, you must find this sheet and rewrite the key.
It will be inconvenient somehow at this stage of the installation to turn the laptop or move the processor.
After choosing the operating system to download, we agree in the next window with the license terms (without agreeing to these very conditions, the system will not allow you to continue installing the OS from a USB flash drive) and in the next window select the type of installation.
Click on Complete Installation.
The next window will prompt us to select the partition where the Windows operating system will be installed from the USB flash drive.

From the existing list, select the item whose type is called "System".
And click "Disk Setup". Several items will appear at the bottom of the window.
Of these, select "Format". When choosing this item, we agree with the warning about the possibility of losing files or programs from the system disk.

We agree without hesitation! After all, before reinstalling the operating system, we copied everything you need to a safe place. From there, everything important can be restored in the new OS.
After the system disk is formatted, click the "Next" button at the bottom of the window. And we humbly wait while the installation is in progress.
The system will then prompt you to enter your username and computer name.
You will be given the opportunity to set a password and enter a hint for it, just in case.
Then you may just need the same key that was recommended above to be written off from the sticker on the computer case.
This is followed by the choice of security mode, time and date. Probably, if you have the necessary driver in the system, you will be prompted to select the type of network connection.
If this item did not appear during the installation process, then the drivers for the network connection will have to be installed separately.
This is where the installation of the operating system from a USB flash drive ends.
Now you can begin to fill the brand new system with the necessary (and not so) programs and drivers.
And finally: you must definitely return to the BIOS and return the settings from the “USB” item to the “Hard disk” item.
You don't want to force your computer to search for a USB flash drive again and again when it boots up, do you?
So, Windows is installed. What conclusions can be drawn after going through the process of self-installing the OS from a USB flash drive?
Conclusion: the time spent once in the future is compensated by savings on maintaining your own computer.
We will keep silent about the knowledge gained in the process of reinstalling the operating system. Knowledge is power.
In the article, we will consider how to properly install Windows 7 from a USB flash drive.
Windows 7 remains the most popular operating system from developers from Redmond. We know how it is installed from a bootable CD.
What to do when reinstalling the OS should be carried out on new laptop without a drive, few people know. A bootable USB flash drive with the distribution kit of the "seven" will help here.
Preparatory stage
Before installing a new operating system, you need to prepare. First of all, you should take care of the digital information located on the system partition. This is the "Desktop" and other directories of the user.
They must be copied to another logical volume or removable drive (not the one that you plan to use as a bootable flash drive for installing the OS).
If you are working with a new computer / laptop, you can safely skip this step (nothing important is stored on the hard drive yet).
The second serious point is the presence of a driver for the network card. Drivers are not for everyone network board are part of the Windows 7 distribution. Without system software, you will not access the global network to download the missing components and software.
Before reinstalling the OS, be sure to download the driver for network adapter, suitable for the "seven" of the corresponding bit depth (bit depth). If it is not possible to get a fresh version of the software, use the outdated one from the supplied motherboard or laptop CD.
Proper installation of Windows 7 from a USB flash drive
Having finished preparations, you can start creating a bootable flash drive with installation files"sevens".
We will need:
- removable storage, with a capacity of 4 gigabytes;
- installation image Windows disk 7 (of the same bit depth as CPU) in ISO format;
- an application for deploying an image to a removable drive (we will consider the process using the example of a simple portable Rufus program).
After downloading the portable edition of the program to write the distribution kit to a USB flash drive, follow the instructions below.
- Launch the app and connect portable storage to the USB port.
Be sure to make a copy of the data stored on the memory card (they will be deleted during the formatting of the device, then overwritten when copying the distribution files).


For the “seven”, the scheme will be an outdated MBR, the BIOS or its updated UEFI analogue can be used as an interface.
How to boot from a USB stick
You can start the reinstallation only by starting the computer from the previously created flash drive. This drive was created in the previous step. Now you need to reboot and tell the BIOS / UEFI that you need to boot from a USB drive, not from a hard drive or SSD.
This is done in two ways:
- change the priority of boot devices;
- once select a USB flash drive as a boot device.
Let's focus on the second, simpler option.
When starting the computer after self-testing, you need to look at the screen, where an inscription with data will appear, which key opens the PC boot device selection window (F2, Del, F9 and F11).
Additionally, this information is given in the instruction manual.

Competent installation of Windows 7 from a USB flash drive
If the instructions above are followed correctly, after selecting a USB device as a device to which privileges will be transferred to further boot the PC, a black background will appear with the inscription: "Press any key ...".
We click on any key of the keyboard and wait until the installer prepares for the deployment of the operating system.

Suddenly, to copy the distribution kit to a removable device, a non-original image of the "seven" (any assembly) was used, the black background with the inscription above may not appear, the launch will be carried out automatically.
Most likely, there will be several versions of the operating system and additional utilities on such a partition. Then we choose the option of deploying the "seven" of the required bit depth.
For 64-bit processors and OS should be set to the same bit depth. The 32-bit version of the operating system does not have enough address space to address more than ~3.25 GB random access memory. If you have 4 GB or more, Windows x32 will only see 3.25 GB.

Specify the interface language, keyboard layout and click on the "Next" icon.

Click on the "Install" button.

Specify the edition of Windows to which there is a key. It will need to be entered at the final stage of the OS installation or within 30 days from the date of its deployment.

Getting to know the points license agreement and click "Next" if you agree with the requirements and terms of use of the software.

We indicate the second type of installation "Full installation" with additional parameters.

We click on the partition that will be used as the system partition.
Click on the "Disk Setup" button to open the configuration interface for the selected volume.
When working with a new device, its hard drive / SSD will have to be divided into several logical partitions.

Often on laptops there are sections of insignificant volume. They store critical files for Windows 7 that are necessary for a quick rollback and restoration of the functioning of Windows.
It is better not to touch these hidden logical drives at all. Also, there will definitely be an area of about 100 MB with the attribute "Hidden", created by the program itself by the installer.
It stores the data necessary to implement BitLocker - a routine for encrypting the system partition and decrypting it at the initial stage of booting the computer.
If the volume should be split into several, select it and click "Create", after which we indicate the volume of the first section and create it. The same is repeated for the remaining sections.
You can format them (it is better to choose the NTFS file system for this due to fewer disadvantages compared to FAT32, and having one huge advantage - support for storing documents larger than 4 GB) can be done both through this disk setup utility and after the deployment is completed " sevens."
The volume of the active volume must not be less than 20 GB for the operation of the OS itself; we add space for user applications and files ourselves.
Select the partition and click "Format".

The program will display a warning that the information on the partition will be deleted and partially overwritten, minimizing the possibility of recovering it if necessary.
With absence important files on the selected disk, press "Enter" or "OK".

Select the formatted logical partition, click Next.
While the files are copied to the future system volume, unpacked and updates for Windows 7 are installed, we just wait for the next dialog box to appear.

We set the name of the account and computer, given that the latter must be entered without the use of special characters and Cyrillic.

Set a password, if needed, and a hint.

Enter the 25-digit license key, if available, and click Next.

We set security parameters or postpone this decision.

Select the current time zone.

Click on the relevant network connection, if the distribution kit found drivers for the network card.

On this installing Windows 7 with boot flash drives completed. It remains to update the installed and download the missing drivers, install the necessary software and you can work on the new system.


