Asus 11 router reconnect. Wireless router Asus RT-N11P. Physical connection of the Asus rt n11p router
After connecting the Internet cable to the corresponding port of the router, you need to go to the device control panel. Standard IP address for RT-N11P routers: 192.168.1.1, however, it may be different, depending on the firmware version.
Important! If the page does not load when entering the address in the browser, you need to check the current IP on the sticker below Asus router. Upon successful upload, enter the default username (admin) and login password (also admin).
In the factory firmware of Asus, serious attention is paid to security settings. This is confirmed by the fact that already at the first step of configuring the RT-N11P router, the user is prompted to enter a new password to enter the admin panel. Next to the text field " New Password» there is an indicator of its reliability, which turns green when using numbers, letters in different cases and special characters.
Important advice! Re-entering the standard "admin" in the new password field is also possible, but highly discouraged. In the event that unauthorized persons gain access to your WiFi, it is very likely that they will try to log in using standard data.
Next, the Asus RT-N11P router will attempt to connect to the Internet. To do this, the type of connection used by your provider will be determined. It can be PPPoE, L2TP, PPTP, dynamic or static IP connection. If after that you need to enter additional data, you can clarify them in the documents provided by the provider. In the absence of this information in the contract, you can contact the provider's support, whose specialists will provide the required information.

You can specify the user account information in the next step, when the type of connection used will be determined. This setting is performed only when the router is connected for the first time. In the future, this data is saved in the settings, and the connection will be performed automatically.

The third step in the quick setup is to specify the network name (SSID) and network key. You set these parameters yourself. The network name will be displayed to any WiFi device within the range of the signal. If you do not want to make this setting public, you can hide the name in one of the following steps - in the "Advanced settings -> Wireless network" menu. To proceed to the next step, click the "Apply" button.

All previously entered data will be displayed on the "Network configured" page. You will only have to check them and confirm the correctness by clicking the "Next" button. Also on this page, information about the Asus router will be displayed: the local IP and MAC address of the router.

Advanced settings
At the end of the quick setup of the router, you will be redirected to the "General -> Network Map" menu. It contains basic information about WiFi, encryption settings and connected devices. In the right column, you can quickly change the SSID, encryption method and password for wireless connection. Below are the LAN settings and PIN code for logging in using QSS technology. They can also be changed on this page.

You can return to the quick setup of the RT-N11P WiFi router at any time using the "Quick Internet Setup" button in the upper left corner of the control panel. This may be necessary if the provider's settings have been changed or if you are experiencing difficulties connecting to the Internet, and there are no restrictions from the provider.
The next tab in the Asus RT-N11P settings is General -> Guest Network. With its help, you can run up to three additional WiFi networks with your own parameters on the router. There are three "Enable" buttons on the page, with each of which you can activate a separate connection.

For guest networks, you can change the following settings:
- Guest network index — the serial number of the connection (from 1 to 3), is set automatically.
- The network name (SSID) is a unique name by which you can find a network.
- Authentication method - the presence of access protection.
- WEP Encryption - Select the encryption protocol.
- Access time - the number of hours and minutes during which the launched WiFi network. If you select "Limitless", the network will work until you turn it off yourself.

Remember! Access to the Intranet (internal network, it is important not to confuse with the Internet) - the ability to access local resources.
For guest networks, you can restrict the connection to internal devices. This may be necessary if you provide an Internet connection to third parties, but do not want them to be able to view confidential information on your home computers.
In the next step (menu tab "General -> Traffic Manager") you will be able to set priorities for various connections. To do this, select one of the values in the drop-down list: "User-defined priority" or "User-defined QoS rules". Then select the services for which you want to change the user traffic rules and set priorities for them. The list offered by the standard Asus RT-N11P firmware contains several dozens of popular protocols, individual applications and online games. You can also add any other application.
To do this, you will need to specify:
- The IP or MAC address of the device on which the service will be used.
- Port of destination.
- Protocol (TCP or UDP).
- Bandwidth.
- Priority in traffic processing.
Tip for inexperienced users!
It is advisable to leave the value "Automatic mode".

Last item general settings — « Parental control". This feature helps to limit the Internet for certain devices in given time. You can add a new device by its MAC address. If it is already connected to a wireless network, you can select the device from the list. In addition to time limits, Asus RT-N11P allows you to configure the denial of Internet access for specified devices on certain days.

Advanced Settings RT-N11P
To fine-tune the device, you need to go to the menu "Advanced settings -> Wireless network". There are six tabs at the top of the page where you can change technical specifications WiFi. Most of the settings presented on the General tab have already been set in the previous steps. The new items are:
- Hide SSID is a feature that allows you to remove the network name from being sent to general access. It will be possible to connect to WiFi through the Hidden Network menu on any gadget, after entering the network name and password.
- Channel width - the frequency range used by WiFi.
- Channel - channel number that affects the frequencies used by the router. It is recommended to leave it unchanged (option "Auto").
- Extended channel - allocation of additional frequencies for data transmission.
- Network key rotation interval - the period after which, based on the WPA password, a unique key value will be generated, required to connect to the network. Specified in seconds.
In the menu item “Advanced settings -> Wireless network -> WPS”, you can change the settings for connecting to WiFi using a PIN code or by pressing a button on the router. The “Wireless MAC Address Filter” tab allows you to blacklist certain devices (prohibit their connection to the Asus RT-N11P router via WiFi).

The parameters that are on the remaining tabs (bridge, Radius setting and professional setting) are not recommended to be changed unnecessarily, as this may lead to WiFi malfunction. The settings presented there are highly specialized, their change may be required only for solving applied problems. In other cases, it is enough to leave the default settings.
There are 4 tabs in the "Local Network" menu where you can configure the addressing. In the "LAN IP" tab, you can set a new address for the Asus RT-N11P router (instead of the standard 192.168.1.1). The "DHCP server" tab is responsible for the settings for automatic assignment of addresses for network devices. DHCP is enabled by default. If you disable this setting, you will need to bind network devices to local IP addresses manually.
Clue! For example, after configuring this function, your smartphone will be able to get the same IP address 192.168.1.7 every time, even if 192.168.1.2 to 192.168.1.6 are free. This can be useful for more fine-grained connection settings (port forwarding, changing routing rules).

In the "Advanced settings -> Firewall" menu, you can enable network protection from hacker attacks. To do this, change the value of the "Enable Firewall" parameter to "Yes". You can also activate DOS protection, thanks to which the Asus RT-N11P router will filter incoming traffic and block suspicious multiple connections. Such filtering increases the load on the device, so its use is justified only if there is a real threat.
The URL Filter tab allows you to block access to user-defined pages. You can also block access to all pages whose URL contains a certain combination of characters. Using the item "Filter keywords» You can block the loading of pages that contain certain words in the text. "Network Services Filter" allows you to restrict access to the Internet in accordance with user-defined rules and time limits.
Before proceeding with setting up the router, check the connection settings by local network. For this:
Windows 7
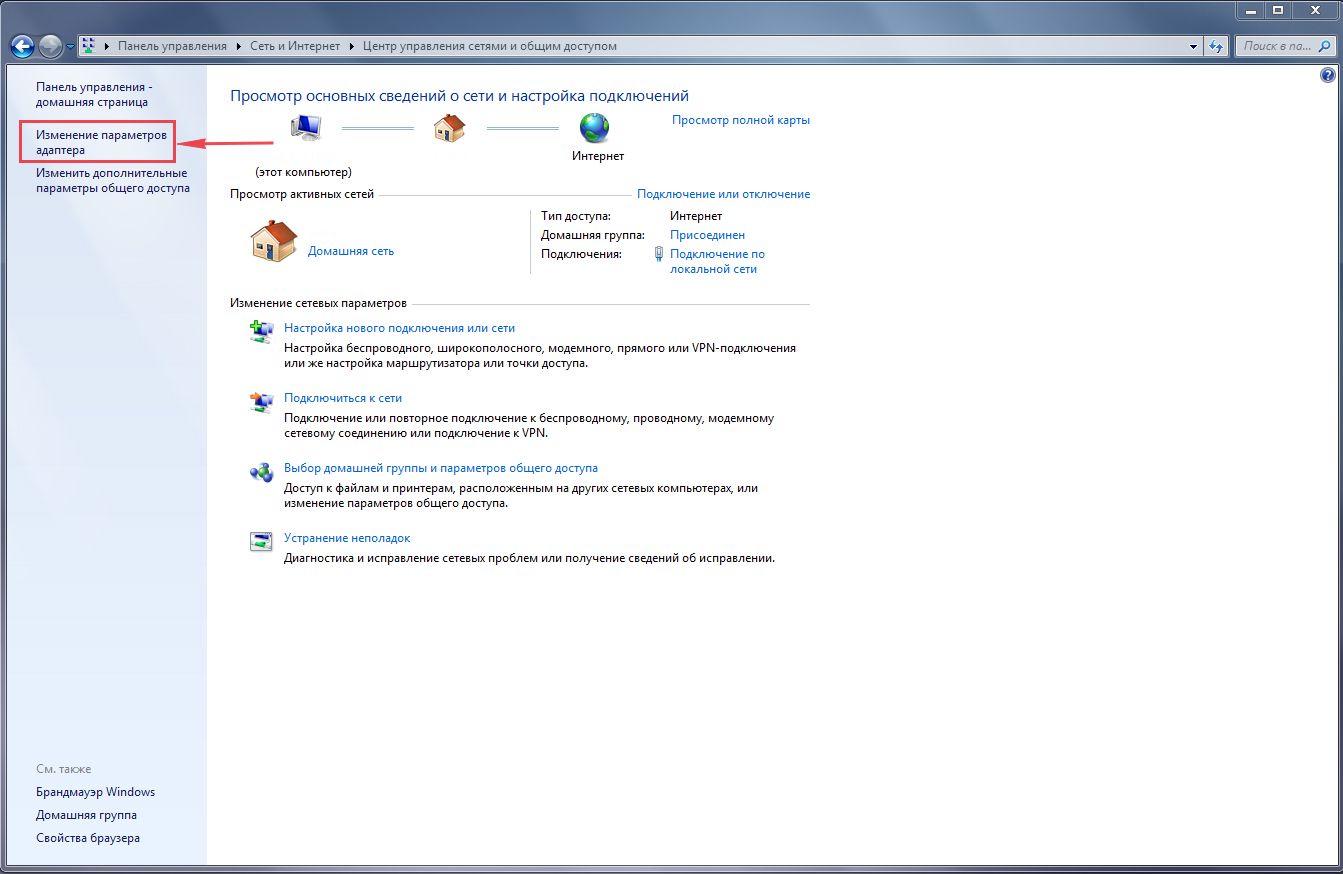
1. Click on " Start", "Control Panel".
2. Click on " View network status and tasks".

3. Click on " Change adapter settings".
4. LAN connectionProperty".
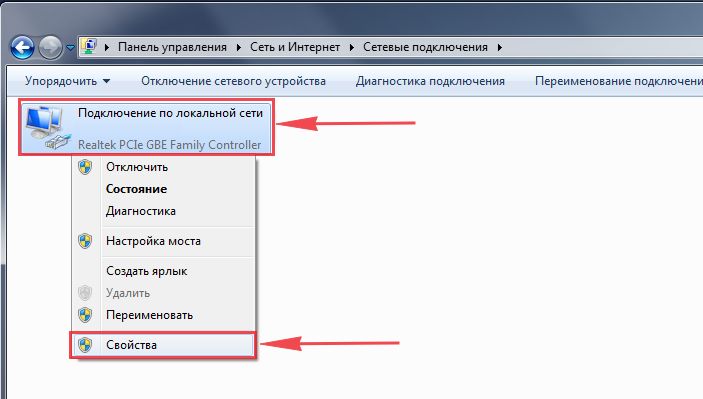
5. From the list select " Internet Protocol Version 4 (TCP/IPv4)"and press" Property".

6. " and "", then press the button " Ok".

Windows 10
1. Click on " Start", "Options".

2. Click on " Network and Internet".

3. Choose " ethernet" and click on " Configuring Adapter Options".

4. In the window that opens we see " ethernet". Click on it with the right mouse button, select " Property".

5. From the list select " IP version 4 (TCP/IPv4)"and press" Property".

6. In the window that opens, you need to check the boxes " Obtain an IP address automatically" And " Obtain DNS Server Address Automatically", then press the button" Ok".

Connecting the ASUS RT-N11P B1 router to a computer
The next step is to connect the router ASUS RT-N11P B1 to your laptop or personal computer(PC). To do this, you need to connect the cable that the provider provided to you to the WAN port of the router (that is, this is the cable that goes to your apartment, house, office, etc. from outside), and the cable that came with router, connect one end to one of the four LAN ports, and connect the other end to your laptop or PC. And yes, do not forget to connect the power cable.

ASUS RT-N11P B1 router authorization
So, we connected the router, now you need to use any browser (be it Google Chrome, Mozilla Firefox, Internet Explorer, etc.) get into its web interface. To do this, open the browser and in the address bar we drive in the address of the router: router.asus.com or 192.168.1.1 and press the button " Enter" on your keyboard.
- Username - admin
- Password - admin
So, we drive in the data and click " Sing in"


Configuring the ASUS RT-N11P B1 router
And finally, we got to the web interface of the router. Now you need to configure the equipment. First of all, we will secure the wireless network by setting a password for wi-fi. Then you will need to find out what type of connection is used to access the Internet, is it PPTP, L2TP or PPPOE. You can find out by calling your provider (this is the organization with which you have entered into an agreement to provide Internet services). So, let's start setting up the router. First, let's change the language of the Web interface to Russian. To do this, go to the upper right corner of the interface and click on " English"and choose" Russian"

Setting a password for wi-fi
I bring to your attention Video instructions for setting a password for wi-fi on a router ASUS RT-N11P B1
Let's also take a written and illustrative look at setting a password for wi-fi on a router ASUS RT-N11P B1.
1.
Go to the Web interface in the menu in the tab " Wireless network".
2.
In the column " SSID" come up with and specify the name of your wireless network, this name will continue to glow when you connect to the network. I advise you to indicate the frequency used in the network name, for example: "imya seti 2.4".
3.
"Channel Width" - 20MHz.
4.
Now you need to set a password for the wireless network. To do this, select " Authentication method" - WPA2-Personal".
5.
In field " WPA preshared key"we come up with and drive in a password. Then click" Apply".

PPTP setup
PPTP on the router ASUS RT-N11P B1 using the ASUS RT-N56U router as an example.
Let's also write and illustratively PPTP on the router ASUS RT-N11P B1.
1.
Internet".
2.
IN " WAN connection type"choose" PPTP".
3.
"" and "" choose " Yes".
4.
Username"), password (on the line " PasswordVPN server
5.
"Hostname
6.
Apply".

Setting up PPTP with a static IP address
Consider connection setup PPTP with static IP on the router ASUS RT-N11P B1.
1.
Go to the menu in the tab " Internet".
2.
IN " WAN connection type"choose" PPTP".
3.
No" against " Obtain WAN IP address automatically" And " Connect to DNS server automatically".
4.
IP address"), subnet mask (in line " Subnet mask"), default gateway (on line " Main gate") and DNS (in line " DNS Server 1" And " DNS Server 2").
All this data is usually prescribed in the contract with the provider. If for some reason you could not find them, you need to call hotline your provider and find out how to get them.
5.
Below you are prompted to specify the username (in the line " Username"), password (on the line " Password"). You will also need to specify the ip-address of the server (in the line " VPN server"). All of the above data is provided to you by the provider (the organization that provided you with the Internet).
6.
"Hostname" - any word in Latin, for example "Host".
7.
After you have entered all the required data, click the " Apply".

Setting L2TP
Consider connection setup L2TP on the router ASUS RT-N11P B1.
1.
Go to the menu in the tab " Internet".
2.
IN " WAN connection type"choose" L2TP".
3.
"Obtain WAN IP address automatically" And " Connect to DNS server automatically"choose" Yes".
4.
Below you are prompted to specify the username (in the line " Username"), password (on the line " Password"). You will also need to specify the ip-address of the server (in the line " VPN server"). All of the above data is provided to you by the provider (the organization that provided you with the Internet).
All this data is usually prescribed in the contract with the provider. If for some reason you can't find them, you need to call your provider's hotline and find out how to get them.
5.
"Hostname" - any word in Latin, for example "Host".
6.
After you have entered all the required data, click the " Apply".

Setting up L2TP with a static IP address
Consider connection setup L2TP with static IP on the router ASUS RT-N11P B1.
Usually a static IP address is provided legal entities, either as additional service to the basic tariff for individuals.
1.
Go to the menu in the tab " Internet".
2.
IN " WAN connection type"choose" L2TP".
3.
Since the connection uses a static ip address, we set " No" against " Obtain WAN IP address automatically" And " Connect to DNS server automatically".
4.
Specify the ip-address of the server (in the line " IP address"), subnet mask (in line " Subnet mask"), default gateway (on line " Main gate") and DNS (in line " DNS Server 1" And " DNS Server 2").
All of the above data is provided to you by the provider (the organization that provided you with the Internet).
All this data is usually prescribed in the contract with the provider. If for some reason you can't find them, you need to call your provider's hotline and find out how to get them.
5.
Below you are prompted to specify the username (in the line " Username"), password (on the line " Password"). You will also need to specify the ip-address of the server (in the line " VPN server"). All of the above data is provided to you by the provider (the organization that provided you with the Internet).
All these data are also prescribed in the contract with the provider.
6.
"Hostname" - any word in Latin, for example "Host".
7.
After you have entered all the required data, click the " Apply".

PPPOE setup
I bring to your attention Video instructions for setting up the type of connection PPPOE on the router ASUS RT-N11P B1 using the ASUS RT-N56U router as an example.
PPPOE on the router ASUS RT-N11P B1.
1.
Go to the menu in the tab " Internet".
2.
IN " WAN connection type"choose" PPPOE".
3.
"Obtain WAN IP address automatically" And " Connect to DNS server automatically"choose" Yes".
4.
Below you are prompted to specify the username (in the line " Username"), password (on the line " Password". All of the above data is provided to you by the provider (the organization that provided you with the Internet).
All this data is usually prescribed in the contract with the provider. If for some reason you can't find them, you need to call your provider's hotline and find out how to get them.
5.
After you have entered all the required data, click the " Apply".

Setting up PPPOE with a static IP address
Consider connection setup PPPOE with static IP address on the router ASUS RT-N11P B1.
Typically, a static IP address is provided to legal entities, or as an additional service to the basic tariff for individuals.
1.
Go to the menu in the tab " Internet".
2.
IN " WAN connection type"choose" PPPOE".
3.
Since the connection uses a static ip address, we set " No" against " Obtain WAN IP address automatically" And " Connect to DNS server automatically".
4.
Specify the ip-address of the server (in the line " IP address"), subnet mask (in line " Subnet mask"), default gateway (on line " Main gate") and DNS (in line " DNS Server 1" And " DNS Server 2").
All of the above data is provided to you by the provider (the organization that provided you with the Internet).
All this data is usually prescribed in the contract with the provider. If for some reason you can't find them, you need to call your provider's hotline and find out how to get them.
5.
Below you are prompted to specify the username (in the line " Username"), password (on the line " Password"). All of the above data is provided to you by the provider (the organization that provided you with the Internet).
All these data are also prescribed in the contract with the provider.
6.
After you have entered all the required data, click the " Apply".

Connecting a computer to wi-fi
After connecting and configuring the router, you need to connect the computer to a wireless network (wi-fi), consider connecting to wi-fi in two operating systems, this is Windows 7 and Windows 10:
Windows 7
Video instruction
1.

2. Sultan

3.
Check the box next to " Connect automatically" and press
"Connection".

4. Specify " Security KeyOK".

5.

Windows 10
Video instruction
1. In the lower right corner of the desktop we find the icon for the wireless network (wi-fi), click on it with the left mouse button.

2. A window pops up with a list of available wireless networks. We select a wireless network, in my case it is a network " Sultanova"(You choose the network whose name was given when).

3.
Check the box next to " Connect automatically" and press
"connect".

4. Specify " Security Key"this is the wireless network password that you specified when. After you have specified the key, press " Further".

5. We wait, perhaps a couple of seconds, and you are connected to your wireless network.

In this tutorial, we will consider the simplest option for setting up the asus rt n11p, and at the end of the article we will also highlight some additional options for managing the router.
Connecting an asus rt n11p router
First, let's briefly consider the device and characteristics of the asus rt n11p router.
On top panel The device has a block of indicators (there are 4 in total):
- - network connection indicator;
- - an indicator showing a working Wi-fi access point;
- - an indicator showing the connection of the Ethernet cable;
- - indicator characterizing the connection to the router asus rt n11p external devices, via Lan cable.
On the back of the router are:
- - a button that resets the asus rt n11p router to factory settings;
- - 4 slots for connecting a Lan cable (for connecting the router to a computer);
- - a slot for connecting an Ethernet cable;
- - connector for connecting the power supply from the mains;
- - router power button
- - connectors for connecting to the router wi-fi antennas, amplifying the signal level of the wireless network.
How to install asus rt n11p router by yourself?
To start the setup, you need to connect the router to the power supply using the included power supply (after connecting to the network and pressing the power button on the front panel of the router, the network indicator will light up).
When setting up a new router, you can safely proceed to the next step. If the router was previously in operation, you must first reset the asus rt n11p router to factory settings. To do this, press the reset button, hold it for a few seconds and wait for the device to reboot.
When configuring the router, it is recommended to use a Lan cable that is connected on one side to the connector network card laptop / computer, and on the other hand, into one of the four free ports on the rear panel (after that, another indicator - will light up on the indicator panel).
Now you can connect the Ethernet cable (provided to you by your ISP). After connecting to the Ethernet, another LED will light up on the router.
This completes the installation of the asus rt n11p router, and you can proceed directly to setting up the device.
How to enter the settings of the asus rt n11p router?
To “log in” to the router, you need to launch any browser installed on your PC, and in the address bar type the ip-address of the router (it is indicated on the service sticker located on the back of the device) - in our case, this is a combination of numbers 192.168.1.1 - and press Enter.

Here you will automatically be prompted quick setup asus rt n11p router:
The first step is to correct Account asus rt n11p router. You will be prompted to set your password to enter the router settings instead of the standard "admin".

After changing the password, we go to the next asus rt n11p setup window, where the router automatically detects the type of connection to the Internet.

If the provider at the conclusion of the contract provided you with a login and password for using the Internet, you will need to enter them in the appropriate fields of the setup wizard.

After the connection is established, click the "Next" button.
Final setup step wifi router is to install a wifi hotspot.
By default (at factory settings), a password is not required to connect to a wireless network, and any unauthorized PC that is in the router's coverage area will be able to connect to your access point without hindrance.

In the window that opens, you will be prompted to enter "Network Name" and "Network Key", where "network name" is the name of your access point displayed in the search for wireless networks, and "network key" is the password that will be required to connect to this network.
For novice users, the question often arises of how to reboot the asus rt n11p router. To do this, it is enough to turn off the power of the router for 10 minutes, then turn on the device and wait for it to fully boot.
Additional features of the Wi-Fi router.
IN this section additional wifi settings broadcasting and the ability to update the firmware of the device.
- How to set advanced wifi settings correctly?
The wifi setup panel is located in the main menu of the setup wizard (on the left).

main function detailed settings wireless network is to change the type of data encryption during transmission to the end device (since not all devices support the Wpa, Wpa2 and Psk encryption type, respectively, before configuring this item, you must clearly understand why this is done)
For example, the PSP portable console does not support most common types of encryption, and connecting it to Wi fi will require changing the encryption type to Wep(Wpa).
A reason is also required to update the firmware of the router (it makes no sense to update the software version in the router just like that, and when choosing wrong driver or firmware version, it is possible to “bring” the device to the point that only a service center can help you).
The firmware update menu is located in the Administration/Firmware Update tab.
The Asus RT-N11P router is a a budget option wireless equipment for network data transmission. Despite the cost of about 1800 rubles, transmission via wire or wifi is lossless. An IPTV connection is also available. The technical characteristics of the model are able to satisfy the needs of any user. Installing the Asus RT-N11P router does not require significant time costs. Connection is carried out to any provider.
It should be noted right away that initially the router must be connected via a wired channel, and not via Wi-Fi. This will help eliminate possible problems with further adjustments. The procedure for connecting the router to the mains and computer is as follows:
- Insert the plug from the power supply into the Power connector.
- Connect the cable from the Internet to the first connector on the right, marked with the sign "e".
- The patch cord, or, in other words, the network wire that is sold in the kit, is inserted into any of the LAN ports. The other end of the cable connects to the network card.
- Connect the power to the mains and press the power button, which is located on the right. After the LEDs are activated, the router will be ready for operation.
Tip: after starting, it is advisable to check the parameters of the network card for the correct operation of the router.
If the equipment has already been connected before to work with other computers, then you need to reset installed settings Asus RT-N11P to factory. For this you need:
- Press the special "WPS / reset" button and hold it off for at least 30 seconds.
- Go to the Administration panel and select the data recovery position.
Resetting can help if you encounter errors during the setup process or if you lose your password.

On the left you see the "RESET" button
Setting
After these steps, the asus rt n11p router will open the Wi-Fi network settings menu, in which you need to enter two parameters:
- Network name - login that will be displayed in available connections.
- Network key - password requested during authorization.
After clicking on the “Apply” position, you will be redirected to the settings page, which indicates that the router is ready for work.

Rostelecom
In order to independently create an Internet connection from the Rostelecom provider on the asus rt n11p router, you need the following:
- Specify the connection - PPPoE.
- Put a marker in front of the WAN, NAT and UPnP enable options.
- Confirm the settings for obtaining an IP address and DNS in automatic mode.
- Write down the information specified in the contract. If it is lost, you can contact the Rostelecom support service.
- Specify the characteristics of MTU - 1472.
- Put a negative marker in front of the Enable VPN + DHCP Connection position.
- Save the settings and click on the "Apply" button.

Beeline
Instructions for setting up a router as part of the work of the Beeline Internet provider are as follows:
- WAN connection type - L2TP.
- Put a positive marker in front of the positions with WAN, NAT and UPnP connection.
- Confirm automatic receipt of the IP address and DNS (If not specified in the contract).
- Enter the username and password that can be found in the contract.
- Enter VPN server information - IP address or its name specified in the agreement with Beeline.
- Save settings.

Tip: Beeline does not require mandatory changes in other parameters. In the host name, you can write any data in Latin.
WiFi
To configure Wi-Fi on the asus rt n11p model, you need to go to the menu for creating a wireless network. The instructions for setting up the network in the window that opens are as follows:
- Fill in the information field with the name of the network, which will be displayed in the menu of available connections. You can specify any combination of words in English.
- To set, reset or change a password for Wi-Fi, you need to fill in the “Authentication” (set WPA2-Personal), “WPA Preshared Key” (acts as a password for the wifi network).
- To create a password for Wi-Fi, you must specify at least 8 characters.
- Finally, click on the "Confirm" button.

IPTV
IPTV in the asus rt n11p router is configured when setting the Internet connection characteristics. To do this, select the item "Select IPTV STB port" and enter the number of the input to which the wire from the IPTV set-top box will be connected.
Firmware
The firmware of the asus rt n11p router is carried out in cases where the user is not satisfied with the operation of the router or if activation is required additional features. To carry out the operation, you need:
- Find and download the required firmware version on the Internet.
- Extract a special BIN file from the archive.
- Select the firmware file in the Administration menu.
- Click on the "Download" button.
Important: download new version takes at least 5 minutes, so it is not recommended to disconnect the router from the network to minimize the risk of unexpected errors.
Video
Found a typo? Select the text and press Ctrl + Enter
Confidently took first place in the nomination "Wireless WiFi equipment". The key role in this, most likely, was played by the top models routers top level. However, the manufacturer also pays attention to the mass segment, in which Russian market Today, several devices are offered, which are quite difficult to navigate. The fact is that some of the models are present in various modifications and versions, so you should pay attention to this when buying.
The hero of this article has so far managed to avoid such confusion. Asus RT-N11P exists in currently in one configuration, and it is this configuration that will be tested in this article. The device is positioned in the mass segment - it has 100 Mbps wired ports and a single-band access point with a maximum connection speed of 300 Mbps. Given that the manufacturer's software is unified in many respects for most models, we should expect high speed and a wide (for this segment) set of functions. In addition, the device is interesting in supporting alternative firmware versions, which may be useful for a certain category of users.
Contents of delivery
The router comes in a standard small cardboard box. It is decorated in dark colors and fully localized. There are photographs on the packaging. key features, detailed specifications and other useful information.

The delivery set is also traditional for the budget segment - a router, a switching power supply 12 V 0.5 A, one black patch cord, a warranty card and a very short instruction for quick start.

The warranty period for the device is three years.
Appearance
Most in your own way appearance the model is similar to the younger brother of top-end devices, obtained by halving the size and removing one antenna. Overall dimensions are 146×111×34 mm excluding antennas.

The case is made of black matte plastic. There are four rubber feet on the bottom. In addition, there are holes for mounting on the wall in one of two positions - antennas up or to the right.

The face features the recognizable "diamond" design of the front panel and a "rough sanded" stripe at the top. In the lower left corner there is a block of four LED indicators.

They do not irritate with excessive blinking (only the Wi-Fi indicator does this), but they have a standard round shape, green color and look rather sad compared to the design in older models.

At the side ends and the bottom there are ventilation grilles. There were no comments on the temperature regime even at high load.

On the back we see two non-removable antennas, five network ports without built-in indicators, a power supply input with a switch, and a WPS / reset button. Everything is located quite tightly, but for this class of models it is excusable.

There are no comments on the quality of the device. The manufacturer keeps it on top and in budget models. The design is nothing special, but it is quite practical and convenient for this segment.
Hardware configuration
The router is based on a Mediatek chip - MT7620N revision 0206. This family is one of the most popular options in the budget segment today. The frequency of the computing core is 580 MHz (in an alternative version of the firmware, a frequency of 600 MHz is used, which is also standard for random access memory). A radio unit that supports 802.11n in the 2.4 GHz band with a maximum connection speed of 300 Mbps is built into the main processor. It also houses a five-port 100 Mbps switch. The amount of SDRAM memory is 32 MB, 8 MB of flash memory is installed for firmware. Formally, for similar models, the variant with 64 MB of RAM is more common, but if there is no USB port and related services that intensively consume this resource can be used less.
There are no radiators on the chips, the cables from the antennas are soldered to the board, there is a place for a console connector.
In general, it can be seen that the manufacturer tried to optimize the cost of the model without compromising its characteristics. For example, there are only four LEDs (and one of them, indicating the presence of power, is not controlled by software), a combined WPS and reset button, four-pin network connectors.
The main testing of the router was carried out with firmware 3.0.0.376_3754. Additionally, we checked the work with an alternative firmware version, which will be described below.
Customization and features
The standard software of the router is similar to the models discussed earlier, except for the lack of a USB port and the corresponding functions. The design and organization of the web interface developed quite a long time ago turned out to be so successful, according to the manufacturer, that the company rarely changes anything in them.
Let's briefly consider the capabilities of the firmware of the router. The Network Map page provides basic information about the current status of the router and clients.

For Internet connection, IPoE, PPPoE, PPTP and L2TP modes are supported. It is possible to access the operator's local network when working with the provider's access server.

A built-in DDNS client is provided, including work with Asus' own service, NAT Passthrough for some protocols, IPv6 implementation in several modes. To access local services, DMZ, UPnP and setting your own port translation rules are used. The router supports IPTV services using multicast, port allocation to a set-top box and tagged traffic. There is also a built-in UDP proxy service.

The settings of the local network segment are traditional - you can change your router's own address, configure the range of DHCP server addresses, reserve addresses for clients, add your own entries to the routing table.

The built-in wireless access point supports modern technologies protection, including WPA/WPA2 with a password and a RADIUS server, has an output power adjustment, can be turned on according to a schedule (one time range for weekdays and one for weekends).

There is also a setup page additional options, MAC address filter, WPS and WDS functions. The user can organize up to three guest networks with their own names and security options.

The router is equipped with a firewall and a DoS protection module. The first contains filters for URLs, keywords in links, and services. The latter can work on a schedule, and the rules specify the addresses and port numbers of the source and destination.
The "Parental Control" function allows you to select for each client the time of working with the Internet for a week with an accuracy of up to an hour.

Since the firmware is unified, it was not difficult to implement VPN services. A PPTP server and a client supporting PPTP and L2TP can be useful for setting up a secure remote access to network resources.
Less interesting, in our opinion, is the use of a traffic management system, since the device belongs to the budget class and with active QoS and high load, the overall speed of Internet access can be significantly reduced.

Diagnostic tools are represented by the ping, traceroute, nslookup, and netstat utilities. In the same section, the user can use the WOL function to power on the clients on the LAN.

The set of system options also does not differ in anything original - changing the administrator password, working with the configuration, updating the firmware, setting the clock. Recall that this manufacturer provides access to the console of the router via the telnet protocol. Although in this case, in the absence of USB ports, this is not very relevant.

Asus solutions have wide opportunities for work control - except for the usual system log, you can view a list of wireless clients, as well as tables of DHCP server addresses, routing, port forwarding, and current NAT sessions.
Alternative firmware
The use of the MediaTek platform made it possible to transfer an alternative firmware created by . The absence of a USB port in this model, of course, reduces the ability to expand the range of functions of the router, but some useful services were implemented thanks to non-standard solutions developer. But we must understand that for the mass user, many of them will be uninteresting and difficult.
However, code optimization and bug fixing will certainly be useful to everyone. Unfortunately, not all problems can be solved new firmware. In particular, incorrect initialization of the network switch in the bootloader leads to the connection for some time of all wired clients of the router to the operator's network at the time of rebooting the device. To correct this situation, you can update the bootloader in the router with the version presented on the above project site.
Recall that we have already tried this software in the Asus RT-N65U model test. In addition, a lot of information is presented in dedicated to this product. Therefore, here we will describe only the main features of the product for RT-N11P. For the test, version 3.4.3.9-091_base was used, which can be updated (and returned to the standard firmware) in the standard way through the web interface. The following description refers specifically to this modification.
The appearance of the interface is noticeably different in design from the original firmware. However, the most significant optimizations, fixes and improvements are related to the built-in software modules.

Russian and English versions are provided, there is built-in help and notes for default settings. On start page is given Additional Information about the operation of the router, in particular indicators of CPU and RAM load, there are cross-links to other pages for quick access to popular options.

As in the original firmware, here you can find the VPN server and client. At the same time, they support three protocols at once - PPTP, L2TP and OpenVPN.

The author excluded the little-demanded traffic control system (QoS), but left it useful feature interface speed monitoring. Graphs are also provided for CPU and RAM load, which can be useful for analyzing device performance under load.

Wireless access point, in addition to basic settings, has the ability to work on a schedule, a MAC address filter, a choice of transmitter power and number of streams, as well as several specialized parameters and modes.

It is allowed to organize a guest access point with its own security settings and restrict access to the main segment of the local network. There is also a useful ability to specify a fixed connection speed for clients, which allows you to "free" from the point of view of increasing the load on the processor to limit the speed of their work.

In the settings of the local network segment, the ability to force wired port speeds, disable 802.3az (Energy Efficient Ethernet, disabling it can help improve connection quality on some lines) has been added, the set of DHCP server capabilities and IPTV functions have been expanded (in particular, IGMP / MLD hardware technology is used snooping, which allows more efficient processing of multicast traffic on wired ports).

To connect to the Internet, there are IPoE, PPPoE, PPTP and L2TP modes, as well as special options for some providers. Implemented several options for working with the IPv6 protocol.

The built-in DDNS client has received support for almost two dozen services. To access systems in the local segment, DMZ, UPnP, NAT-PMP and PCP are present, as well as manual setting port translation rules. It is possible to pass VPN traffic through NAT and several ALGs.

The firewall contains pages for setting up blocking by URL, MAC addresses and programming rules on LAN / WAN segments with addresses and ports of systems. In all lists, you can use the schedule of their work.

In system options, except standard set with a password, configuration, firmware and time, it is possible to change the port number of the web interface, enable access to the console via telnet and ssh, direct access to the console to execute interactive commands and other features.

In the "Personalization" section, the user can change the action of the WPS / Reset button. Short and long presses can be assigned to control the LEDs on the case, wireless access point, Internet connection, and other functions.

In addition, there is a service for determining the status of an Internet connection using external hosts and the ability to run custom scripts when certain events occur.

Control of the status of all interfaces is provided, including viewing of connected wireless clients and their parameters.

Like the original firmware, in addition to the system log, there are tables for the DHCP server, port translation, routing, and current connections. Work with the Syslog server is supported.
Performance
The model under consideration is positioned in the mass budget segment. So the set of basic requirements is quite simple - stable work with the Internet at speeds up to 100 Mbps and maintenance of a wireless network for smartphones and tablets.
Both firmware versions are compatible with Beeline Internet when connected via the L2TP protocol. The connection is stable, there are no comments on the speed of work. The load in the form of a p2p client is also quite within the power of the router, while providing a high speed of 8-10 MB / s. But in this case, it is very desirable to set speed limits and the number of connections in the program settings, otherwise it can take up the entire Internet channel and all the resources of the router, so it will be uncomfortable to use other services. However, this is quite acceptable behavior for a device of this class. A similar remark applies to the simultaneous download of IPTV viewing files through multicast broadcasts - without restrictions for a p2p client, the picture can sometimes “crumble”. With a reasonable load on the router, there are no complaints about watching TV, including via Wi-Fi.
Testing on the stand was also carried out with the two firmware described above - standard and alternative. So there are more graphs in this material. The first pair shows the results of routing speed evaluation in IPoE, PPPoE, PPTP and L2TP modes when working with one/two streams and sixteen streams.


Since we are already familiar with this hardware platform, and the quality Asus firmware we know the high results are not surprising. As for the alternative version, it performs better than the original one, which is especially noticeable in full-duplex tests with PPTP and L2TP protocols.
Both firmware are able to provide work with the provider's network during VPN connections. There are no comments to work in this scenario.


We tested the built-in VPN server with PPTP protocol with all Internet connection options and modes without encryption and with MPPE128. The graphs are averaged over three scenarios (receiving, transmitting and full duplex to four streams in each case).


First of all, let's pay attention to the significantly higher results in this test for the alternative firmware. So if among your tasks is the implementation of remote access to home network, the recommendation is to use an alternative version of the built-in software quite justified.
For speed testing wireless hotspot access adapter TP-Link TL-WDN4800 (802.11n, up to 450 Mbps) was used. The tests were carried out in one/two streams and in eight streams. The router was configured for maximum performance with WPA2-PSK AES and a wide channel. Three wireless client placements were tested: four meters of line-of-sight, four meters behind one wall, and eight meters behind two walls.


Before commenting on the results, we recall once again that today wireless connection in the 2.4 GHz band in urban areas can be completely unpredictable due to the large number of networks and other interference. So you need to be very careful with these figures.
As we can see, in general, the firmware shows similar results in the test. As for the absolute values of the speeds, they are quite consistent with the hardware configuration of the router.
conclusions
Of course, the attention of such a large company as Asus to the mass segment can only be welcomed. The RT-N11P router, despite some obvious signs of savings, has a good design, high quality manufacturing, fully consistent with the name of the manufacturer, an extended set of features and decent performance.
The use of the MediaTek platform made it possible to achieve practically the maximum indicators for this hardware configuration in routing tests. So the router can be safely recommended to users of any tariff plans with speeds up to 100 Mbps inclusive.
Among the additional features of the device, we note support for IPTV technologies, guest wireless networks, as well as the presence of a VPN server and parental control functions.
Adds attractiveness to the model and the ability to install an alternative version of the software. Despite the lack of a USB port, which is usually associated with many additional services, the list of differences from the standard firmware is significant, and many of them are very interesting and useful. However, in terms of speed, such a replacement also has an advantage in certain scenarios.
The router is already presented on the domestic market. In terms of cost, the model turned out to be quite competitive in its segment.


